Three prisoners arrive at the manor of Duke Adele Verona to receive justice for their crimes, only to be caught up in a story of betrayal and blood magic. This is a fantasy/adventure story with a unique twist.
Genre: Fantasy adventure
Number of players: Exactly 3
Run time: Approx 3 to 4 hours
CONTENTS:
- World Briefing
- Character Creation
- GM Briefing
- Offline Version
- Rules
- The Map
- Sound Effects
- Music
- Setup
- Act 1
- Act 2
- Act 3
- Credits
All players should be aware of the following:
Long May She Reign is a game set in a fantasy world where magic and witchcraft is real and the culture has a strong history of using tattoos to channel benefits akin to a good luck charm. A boxer might tattoo their arms for strength or an expectant parent may tattoo their belly to bless their child with health. Blood is the source of magic in this world and tattooing channels that magic in ways that are small and subtle.
Powerful magical rituals can be cast by spilling human blood, but the act is reviled by most decent folk. Blood witches practise these dark arts in secret, since the penalty for being a blood witch is death.
The players take on the roles of three villagers, each from a different village. They have never met each other before today. Village life is a simple one of toil, occasionally interrupted by visits from the Queen’s soldiers. You live under the rule of Queen Isabella and she often excises her right to to claim fresh recruits to be conscripted into the Queen’s army. You have no choice in the matter and it’s simply the way things are. Sometimes you’ll receive letters from conscripts describing how well they’re doing in the Queen’s army as they’re paid and fed well. Other times you’ll just never hear from someone again.
At the start of the game each player character has been accused of a crime and you’re all being transported by via prison wagon. Your destination is manor of Duke Adele Verona, who is authorised to dispense justice on the Queen’s behalf.
(Note that this game treats words like duke and witch as gender neutral terms.)
Players have their pick of three characters accused of three different crimes: The Thief, The Murderer and The Bloodwitch.
GM Note : The answers on The Murderer’s character sheet help generate an important Non-Player Character.
To set the tone, feel free to play this soundtrack during character creation.
Want to print out a copy of this game? Or want to save a copy to your device so you don’t have to have an online connection to start playing? Then use this PDF version.

This section is for the game masters’ eyes only.
Spoilers ahead for players.
Long May She Reign isn’t a straightforward fantasy adventure – it’s actually a game about being caught in a time loop.
In the course of this game players will encounter a blood witch who, with their dying breath, will lay a powerful spell upon them. This spell traps the players in a time loop that persists until the Jenga tower collapses again.
This isn’t a game you can run on the fly because of the time loop element – players need to be expect a level of consistency so they can learn the patterns and exploit them. How all of this works will be explained throughout the information below, so make sure you read all of this in full before you run a game for your players.
GM Note: In this game we are using most of the core rules of Dread – with some important exceptions. Even if you’re a veteran Dread player or GM, you’ll need to review these rules. These are the rules the players need to know going in.
Dread is a role playing game that is played with no dice and no numbers. Instead, we use a Jenga tower resolve player actions.
- Build the Jenga tower in full. (Unlike normal Dread, you do not need to remove an additional 3 blocks from the tower.)
- Whenever players make an action they must pull blocks from the tower.
- The GM will tell you how many blocks to pull. Simple actions may only need a single block pull, but riskier actions require more block pulls.
- Normal Jenga rules apply: only pull with one hand, blocks get stacked back on top of the tower, the block being pulled must be from beneath the topmost complete layer, etc.
- Risk-free actions (like searching a suitcase) may require no pulls, but the game master may offer things like asking players if they want to do a thorough search. For example pull 1 block to search the suitcase – and find the hidden compartment!
- If the tower topples, then that usually means the end for that character. (We’ll address how dying works when it happens.)
- Players cannot deliberately choose to knock over the tower to “sacrifice” themselves in Long May She Reign.
There are other rules in this game – but the GM will explain those when they become necessary.
For the convenience of the GM, here’s some shortcut links to these ‘secret rules.’
Although Long May She Reign has some unique rules for this scenario, the full rules for Dread can also be purchased here for $12.
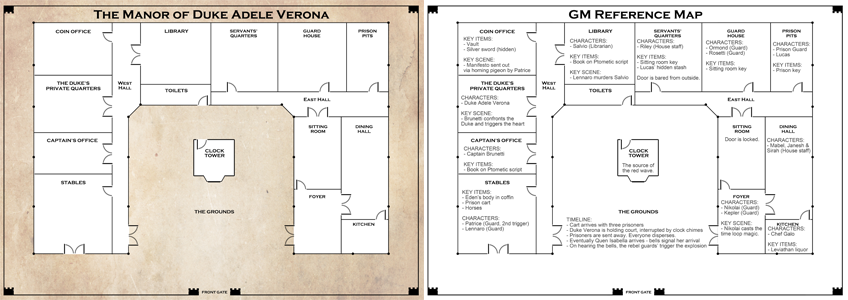
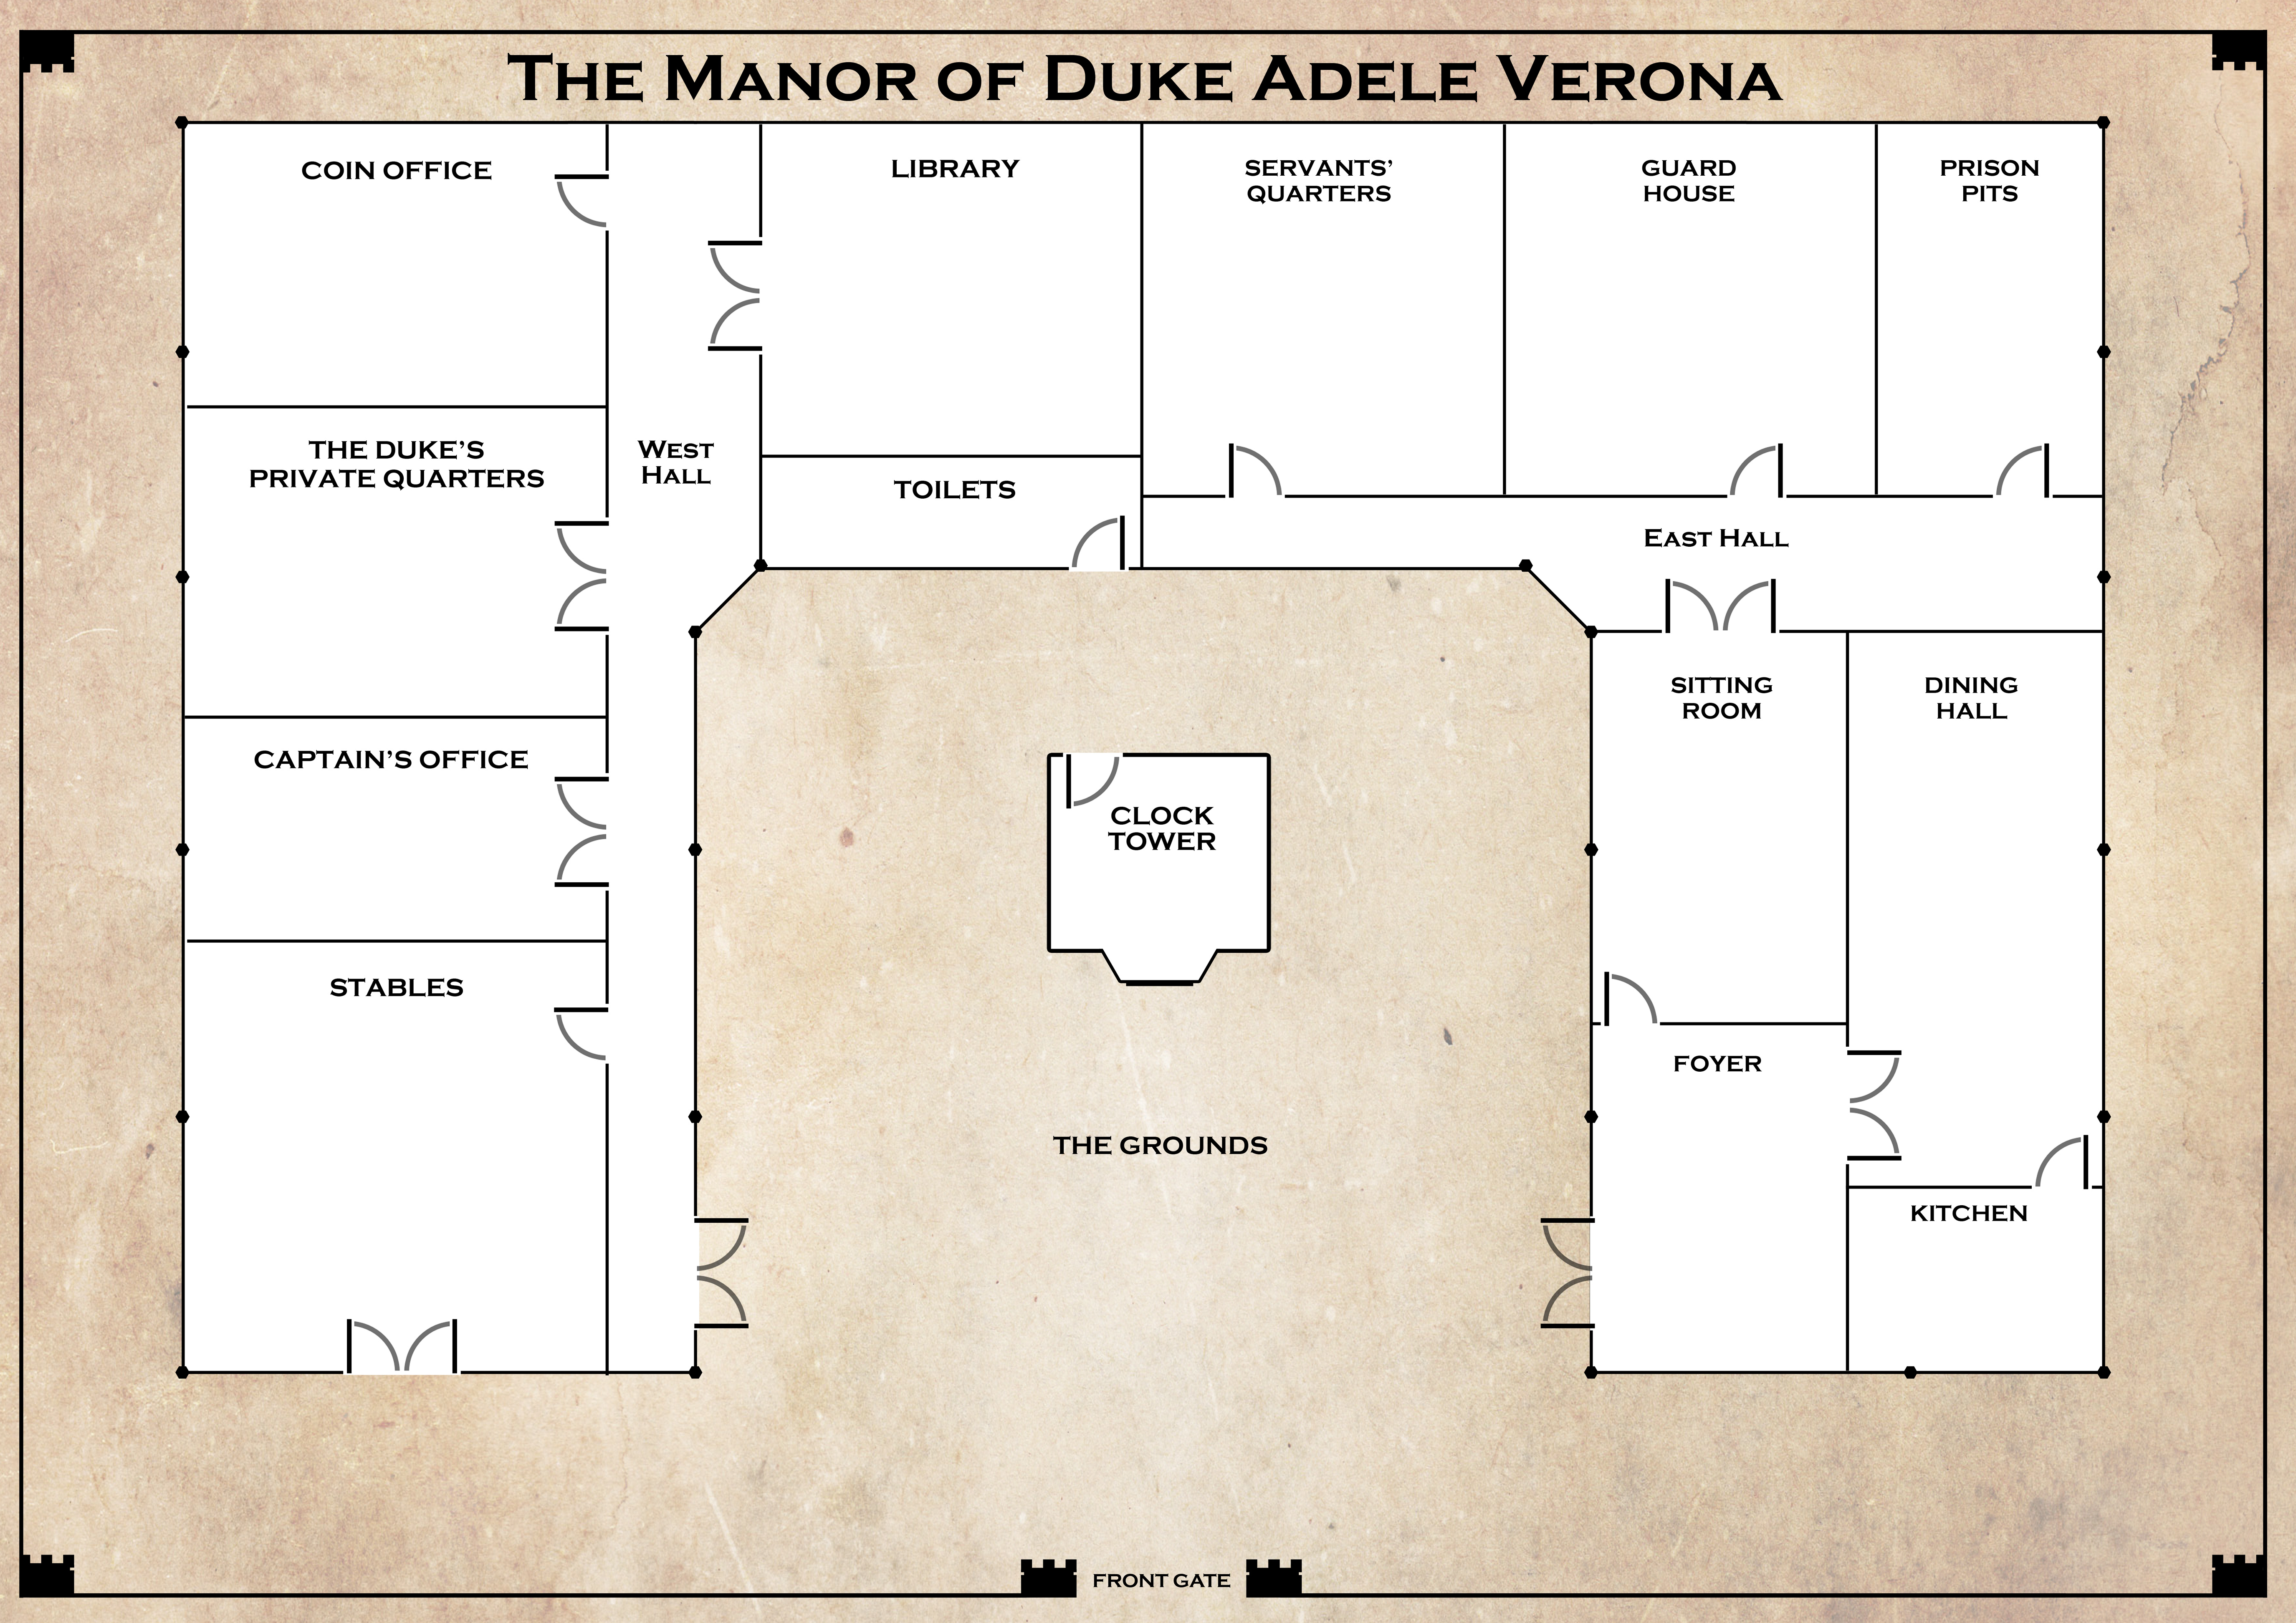
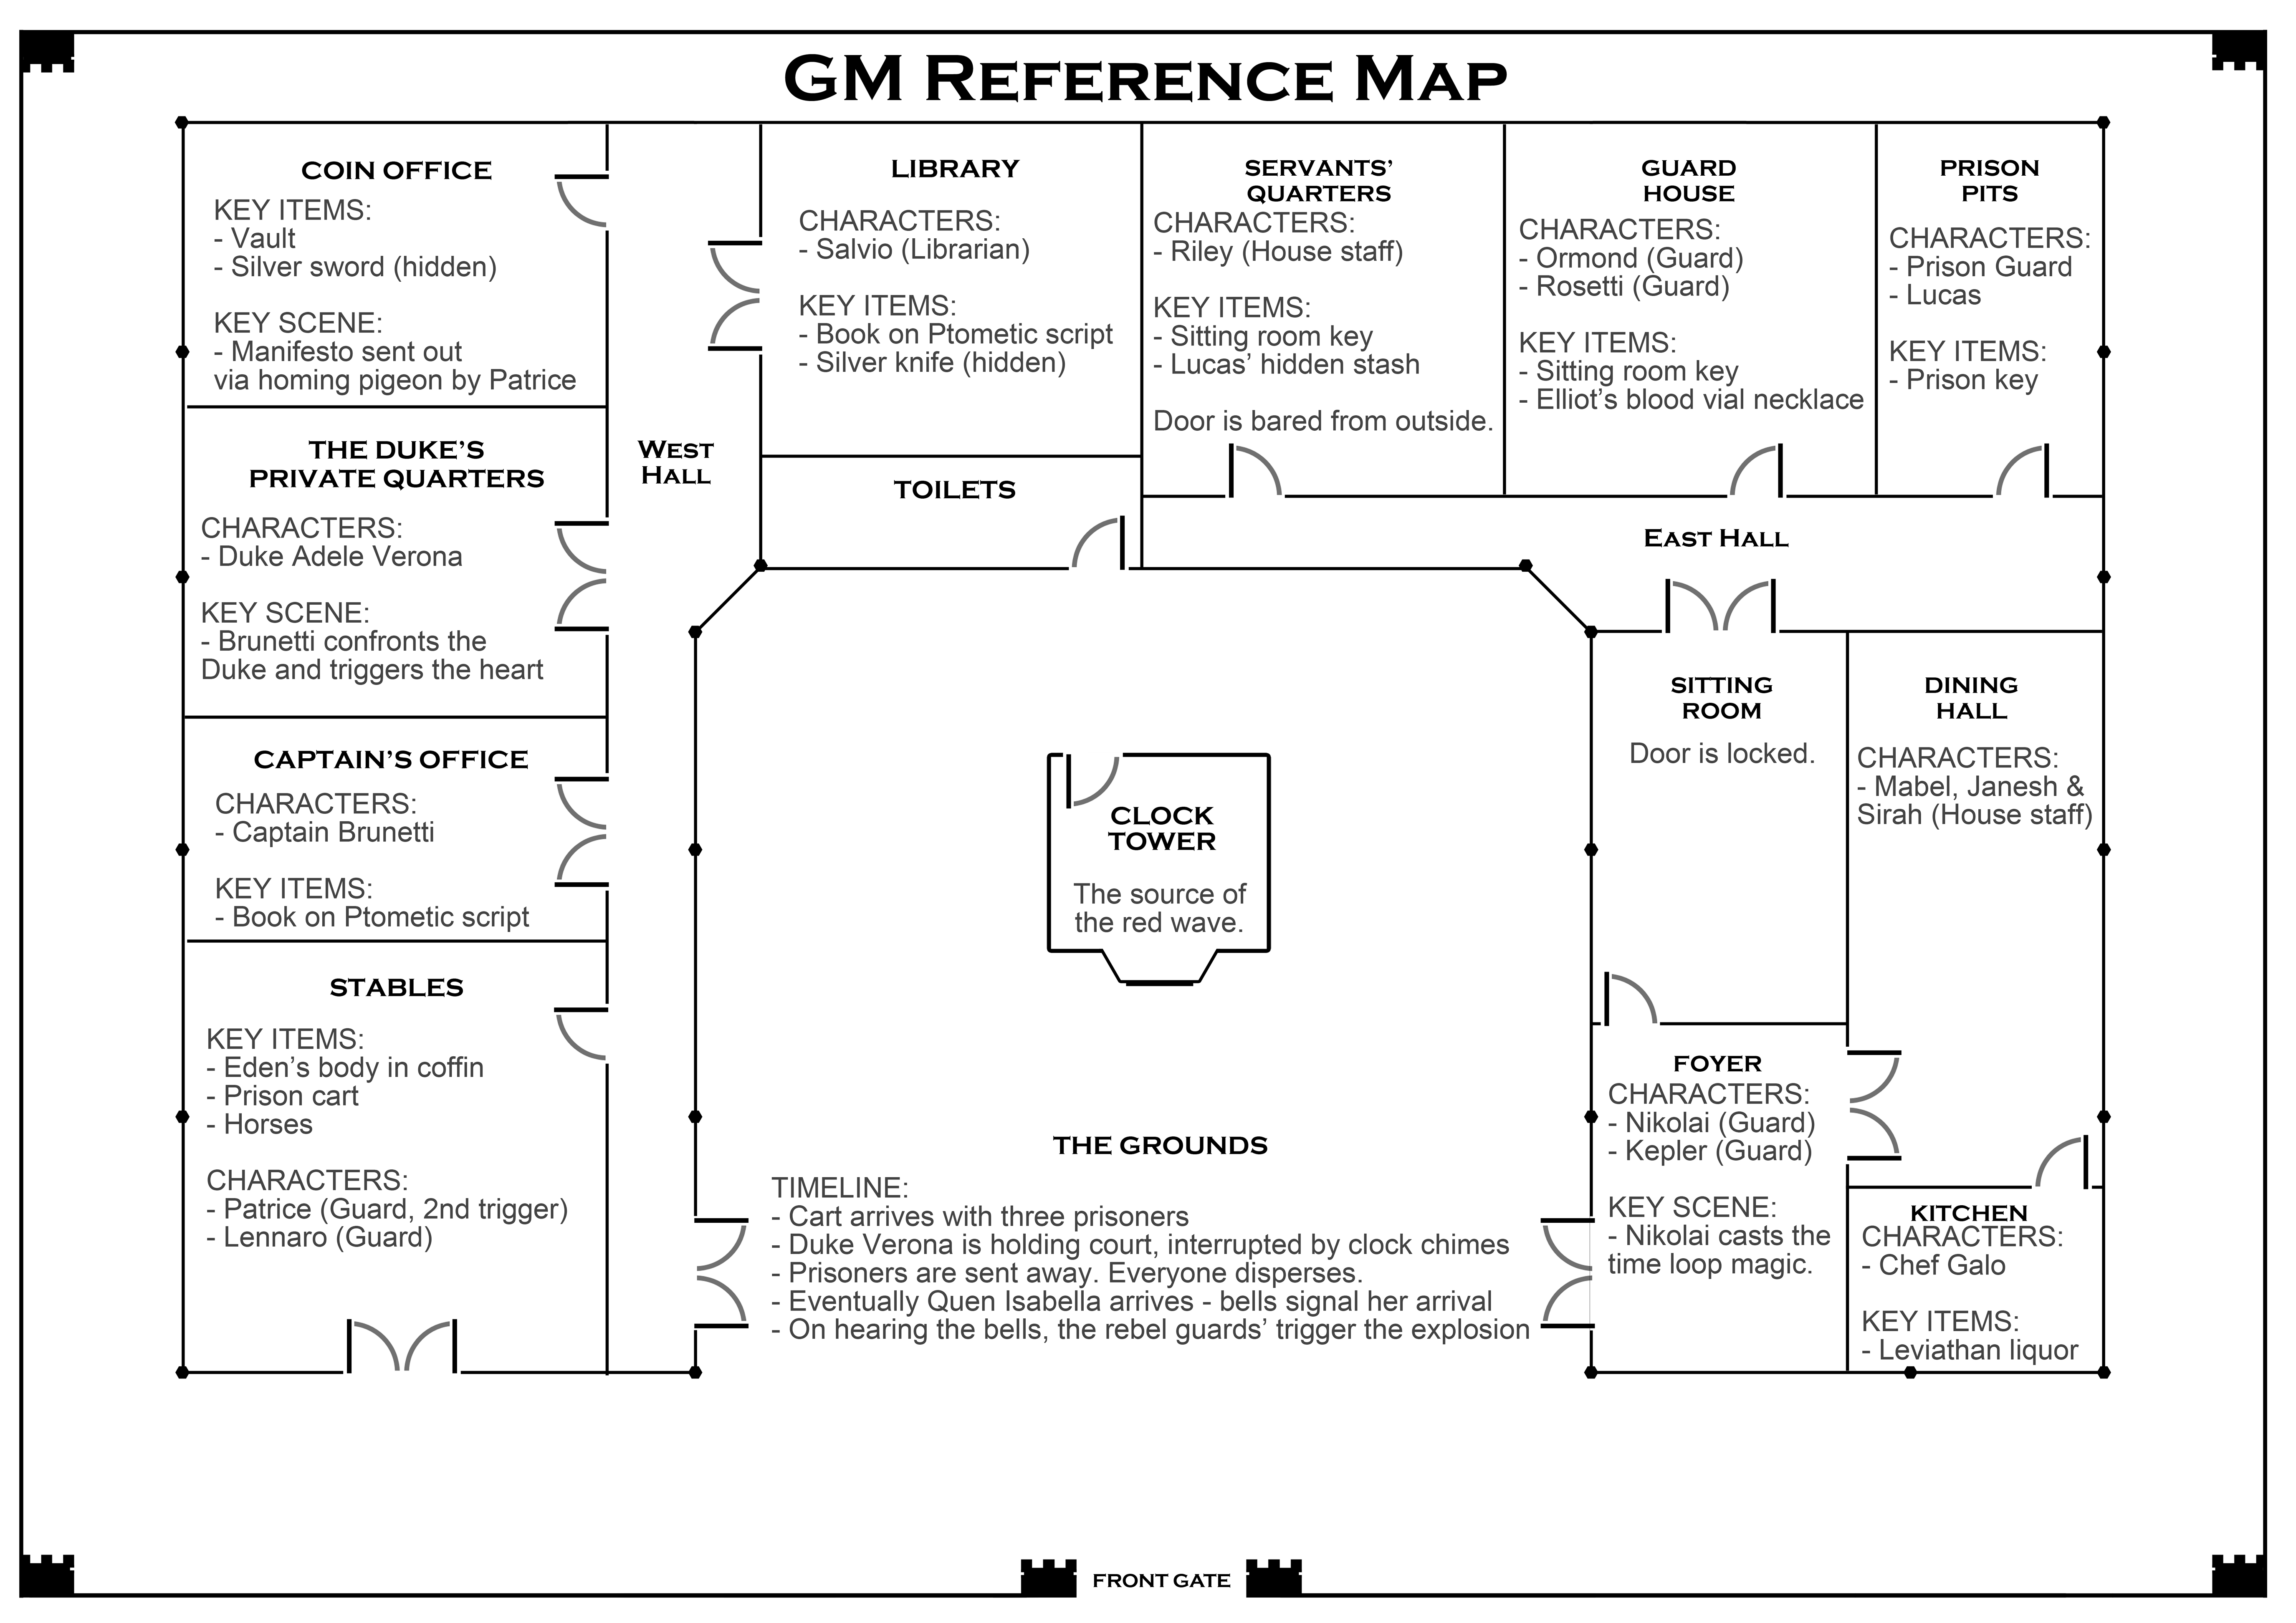
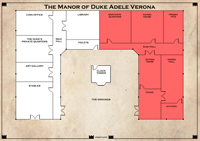
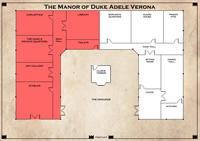
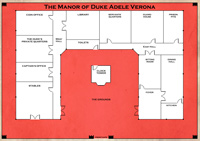
There are two maps used to run this game. The players’ map should be set on the table for all to see. The game masters’ map is for the GMs eyes’ only and has notes to remind you of important characters, items and scenes within each room.
Each room has its own timeline of events and unique characters. It’s in exploring these locations across multiple playthroughs that the players will discover all they need to know to succeed. Whatever succeeding looks like to their character.
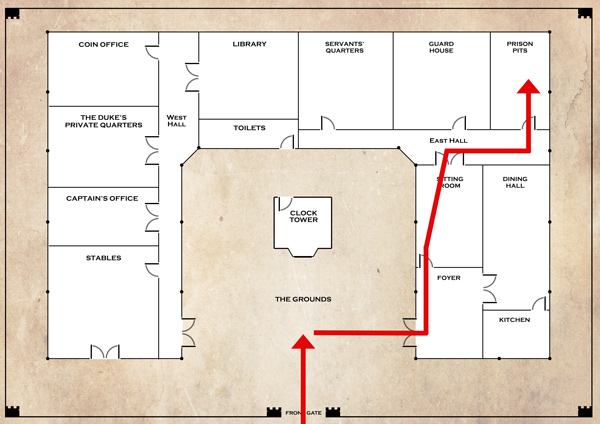
Act 1 lays out all of the information you’ll need to play the first loop, in which players will only explore the part of the East Wing of the manor. Players will inevitably meet Nikolai who casts the time loop magic, shortly after which a deadly red wave of magic kills everyone and play moves into Act 2. Act 2 details all of the locations across the East and West Wings and The Grounds.
Feel free to use the maps however best suits your play style, but here are some suggestions:
- Use tokens to keep track of player locations. This is especially helpful if players ever split up.
- Make each room a surprise by covering the names’ of the rooms on the players’ map
- Feel free to write on the GMs map. If you add a new detail to a room, you need to make sure it stays consistent for each loop.
This adventure comes with sound effects that emphasises the cyclical nature of the time loop. You can just play the embedded sound files straight off the page here – or you can use the QLab show files below to run the sound effects for a seamless audio experience.
- Download the QLab software (Free – Mac only)
- Download the Long May She Reign QLab show files
- About using QLab
If you’re using the QLab show file to play sound effects, you’ll also see notes like [Play SFX1: Cart Arrives] throughout this document to tell you when sound effects should be played.
Since this game is based on a time-loop we do not recommend playing music throughout the experience. However, we do have two music tracks for character creation and playing as ‘end credits’ music.
To run Long May She Reign, you’ll need to have the following set up your players.
Essential:
– Printed character sheets
– Printout of the players’ map
– Printout of the GMs’ map
– Printout of the post-loop rules
– A Jenga tower or similar
– 5 x six-sided dice (3 white, 2 red)
– Pens/pencils
– This game guide
Recommended:
– Speaker system for running sound effects
Optional:
– Small tokens to represent character location
– Paper pieces and blu-tak (or similar) for covering room names
– Stickers and markers so people can make character name badges
In which players land in the midst of trouble.
GM Note: Remember, players should step into this game not expecting a magical twist or a time loop. They’ll play they first loop as though this is their only life. The patterns you set here must repeat consistently and only deviate due to players’ changing things on subsequent loops. And of course any deviation only exists for the duration of that specific loop, then it all gets reset again.
ARRIVING AT THE MANOR:
[Play SFX 1: Cart Arrives]
Everything is darkness. You cannot see anything, thanks to the burlap sack covering your head. You feel the rough rope around your wrists and legs that has been fashioned into a kind of rope shackle, designed to limit prisoners like yourselves to a shuffling walk. The three of you feel the rocking of the cage wagon start to slow and finally pull to a stop.
Multiple unseen guards grab you and pull you out of the cage. Someone roughly removes the sacks from your heads. Suddenly you’re reeling from the sunlight and the lavish grounds of the Duke’s manor. Towering above it all is the clock tower – and it’s perhaps the most impressive and beautiful thing you’ve ever seen.
Then your eyes drop to the scene in front of the clock tower where a small crowd of guards and serving staff stand before a raised stage. On the left side of the stage, flanked by guards, there’s a young man kneeling before a large wooden block. On the right is a woman pontificating from the comfort of her ornate deck chair. This is Duke Adele Verona and she is holding court.
“Eden Taylor. You have been found guilty of the crime of blood magic. In the name of Queen Isabella – long may she reign – you are hereby sentenced to death. Captain Brunetti: carry out sentencing if you please.”
Captain Brunetti executes the order in plain sight. The young man, Eden, is forced forward onto the block where the captain swiftly lops off his head. A grim reminder of what fate may await some of you.
Then a woman in the white uniform of a chef steps forward from the crowd. This is Chef Galo and she starts presenting evidence as to why and how a servant called Lucas stole silverware. Chef Galo tugs on Lucas’ arm and brings him forward.
[Play SFX2: Clock Tower]
The chime of the clock tower strikes thrice, interrupting Chef Galo’s presentation. “Sod this smoke” mutters the Duke, putting out her pipe before addressing the assembly.
“This brings today’s hearings to a close. All unheard cases will receive justice on the morrow. This evening we have the honour of hosting the official Queen’s Day celebration, so look lively everyone. We haven’t much time before Queen Isabella and her entourage will arrive.”
The Duke quickly orders for a guard to move Eden’s body to the stables, Chef Galo to put supper on heat and for the guards to send all prisoners – both Lucas and the three new arrivals – to the prison pits.
TO THE CELLS
You’re all escorted by Captain Brunetti and a half dozen guards armed with swords. You’re marched across the grounds and into the East Wing Foyer.
As you enter through the Foyer, you can’t help but notice the lone guard standing at attention to greet guests. They’re bald and it looks like every inch of their body is covered in intricate tattoos, right down to their fingertips. They’re the second most beautiful and impressive thing you’ve seen today.
You pass through the Sitting Room and the East Hall before being brought to the Prison Pits.
GM Note: You should trace the players path and reveal the covered names of the rooms as the players are escorted.
PRISON PITS
The prison pits are unlike anything you’ve seen before. There are two deep stone pits that serve as prison cells here. Lucas is sent into a pit on his own, while the rest of you are sent into the other pit. All three of you have to climb down using handholds cut into the bricks. It’s slow work with your rope shackles still on. Once you are all down in the pit cells, the metal grate swings down over you like a hatch and seals you in.
[Play SFX3: Metal grate]
The most remarkable aspect of this unique prison design is the giant mirror placed at a 45 degree angle above both pits that allows the guards to observe prisoners from a distance without having to peer down into the grate.
GM Note: This is a bit of an elaborate setup, but the prison pits serve two functions. First they’re an indicator that this world is slightly different from our own history. Secondly and most importantly it ensures that players will have to work together to get out of the pit when that opportunity arises in the near future.
Of course, the angled mirror also lets you see around the room too. You can see the other guards exit the room leaving behind just a single prison guard, who has already sat down and started reading a book. You can also just make out Lucas locked in the other pit by themselves.
This is the point at which play really starts for the players. (Of course on subsequent loops they are most welcome to disrupt the flow of the opening sequence.)
During this first visit to the prison the following will probably happen:
- Players will talk among themselves
- Players may chat to Lucas
- Players will chat to the Prison Guard
CHARACTERS:
Prison Guard
- The prison guard is actually an old friend of the player character accused of murder. Draw from their character sheet to generate their name.
- The prison guard has since found good prospects working for Duke Verona. They aren’t going to betray the Duke and release the prisoners – at least not unless the players manage to convince them somehow with knowledge gained in subsequent playthroughs.
- If the players don’t engage with the prison guard, have them overhear their old friend talking and chime in saying they recognise the voice of the murderer character.
- The prison guard is a good source of info on what will be the sentences for each crime. Witches are beheaded, murderers are sent as live bait on leviathan hunting ships and thieves lose a hand.
- They are currently reading a raunchy book while on guard duty: Waves Of Passion. It’s a homoerotic tale of love between two sailors on the high seas. It makes leviathan hunting seem much nicer than they actually are. In truth they’re extremely dangerous, but the meat and blood from these monster sized fishes make it worth the risk.
Lucas:
- Lucas is a kitchen assistant who works under chef Galo
- If asked about being accused of stealing, he will deny the accusation fervently.
- Players can search his bed in the Servants Quarters and find a stash of the items that he has been stealing. As a humble worker, he enjoys stealing things he could never hope to buy for himself. Players can leverage that information against him when they uncover it – but until they have that leverage he will insist he’s innocent.
After a bit of this the GM can interrupt and move the plot along. Two guards enter: Ormond and Rosetti. Ormond is carrying a large bowl.
The Prison Guard looks up from their book, somewhat confused. “Are the prisoners are eating early today?”
Without a word, Ormond tosses the contents of the bowl in their face. It’s full of flour – and the distraction allows Rosetti to come around and neatly slip a knife in between their ribs. The Prison Guard staggers and collapses backwards onto the prison grate. Blood tickles down and drips onto the three prisoners below.
“Well that’s that. Let’s keep going.” says Ormond, taking the sword from the prison guards’ scabbard.
“What about the prisoners?”
“They’re not part of this. They’re just caged birds.”
They take the sword from the prison guards’ corpse and exit, leaving the prisoners to their own devices.
Players will likely want to inspect the body of the prison guard and will notice the keys dangling from their belt. If they don’t, have one of them make a ‘perception pull’ of 1 block to notice this detail. Once they snatch the keys and unlock the grate, at least two players will need to work together to push the grate open with a dead body on top. Have each contributing players make pulls as appropriate. This of course, will be a bit harder if they haven’t helped each other untie the ropes around their ankles and wrists. (But not impossible.)
Once players are out of the prison pits, players may try doing the following:
- Take a guard uniform. However they’ll find it won’t be too useful covered in blood. But let them find that out the hard way. It’s a time loop game, so they can make mistakes and then learn from them!
- They may try to talk Lucas into coming with them, but at this stage Lucas will refuse to leave the cells, saying that if he runs he’ll only look guilty. (Again, once players discover that he has been stealing, they can use this information to their advantage.)
- And most importantly, players will eventually move on to explore more of the manor.
THE EAST WING:
GM Note: Due to a scripted event in the Foyer, players will only explore part of the East Wing. They’ll be free to explore the whole manor after this first loop.
Also note that during Act 1, players are half-way through the games’ timeline by the time they escape the prison pits. There will be more events for players to find in the timeline of Act 2.
PRISON PITS
Players have just escaped from this location. They should probably find somewhere else to be.
WEST HALL
The hall is empty – except when Ormond and Rosetti pass through. (See timeline.) There are several doors here.
- The door to the Guard House is unlocked.
- The door to the Servants’ House is barred, but only from the outside with a broom, which they can remove without making a block pull.
- The Sitting Room door is locked.
TIMELINE:
- During their first run, no characters are scheduled to come out by the time the players escape the prison.
THINGS TO FIND:
- There are no items of interest in the hallway.
GUARD HOUSE
DESCRIPTION:
The room is lined with rows of bunk beds, all with name plates saying the name of the guard who calls that bed home. Most bunk beds have small chests underneath them, containing the guards’ personal possessions.
TIMELINE:
- After visiting the Prison Pits and the Servants’ Quarters, Ormond and Rosetti return to the Guard House to sit down and play cards. They remain here waiting out the arrival of Queen Isabella. If they notice the players, they won’t be happy to see them. Feel free to be lenient and have players make stealth pulls instead of being caught out.
- As players pass by, have them overhear Ormond and Rosetti talking about the Duke’s ornamental sword. “…it was a gift from some noble or other. The sword is silver, so it’s not much use for fighting and it looks pretty ugly. So the Duke just keeps it hidden under her couch!”
THINGS TO FIND:
- There are two dead guards in here, obviously killed in their sleep. Their uniforms are no good for disguises since they have blood all down their chests. The names of the dead guards are Frances and Lugo.
- There are no spare clean uniforms in this room – or spare weapons lying around. That would be too easy.
- Ormond and Rosetti both carry a key to the sitting room.
- The personal chest of the Prison Guard contains love letters between them and their partner Elliot, who is a fellow guard stationed at the royal palace. Searching the bed will reveal a vial of Elliot’s blood that dangles from a handsome chain necklace. Searching further players can also find a box containing the blood vials of past lovers.
- The personal chest of one of the dead guards contains a diary. The diary starts when they got their first paycheck from working here. He writes of his early excitement of working here and how he is sending money to his family back home so that they will live a better life.
- Players may want to search the bunks for other items or search the bunks of other characters they meet. Feel free to make up contents as needed. Bonus points for items that shed some light on the personality of a character as well as being a useful item to a player.
CHARACTERS:
- Ormond and Rosetti are rebel guards who are part of a plot to assasinate Queen Isabella. But players’ will learn about that plot once they get to Act 2.
SERVANTS QUARTERS
The door to the servants quarters has a broom through the handle as a makeshift bar to lock the door. Players can easily remove the broom to enter.
DESCRIPTION:
The servants quarters is filled with bunk beds. Each bed has a name plate describing who sleeps here and underneath bed are chests containing people’s personal goods. One person is asleep here – a house staff member named Riley. There’s a large key sitting in plain sight atop the chest next to them.
TIMELINE:
- Since Riley is asleep, nothing thing further happens in this room unless player actions change this.
THINGS TO FIND:
- Riley the house servant is asleep here. Players will need to make stealth pulls if they don’t want to wake them up.
- There is a key to the sitting room in plain sight. Players can try to creep stealthily and steal it. (1 or 2 block pulls.) Or they can just rush in and take it for free, but doing so will wake Riley.
- Lucas has a bed here. Players can search the bed for stolen goods. A thorough will reveal a loose floorboard under the bed where he keep his stolen good. They’re many fine things in there, but strangely, not silverware. There is however the contents page torn out from a book called The First Blood Witches. (Players can go to the library in Act 2 to follow up on this clue.)
- Feel free to have one or two clean servants uniforms lying around.
- Players may want to search the bunks for other items or search the bunks of other characters they meet. Feel free to make up contents as needed. Bonus points for items that shed some light on the personality of a character as well as being a useful item to a player.
CHARACTERS:
- Riley will call for the guards if awoken. They of someone who believes that working for Duke Verona is an honour. They can barely remember the days when they used to hunt deer with their mother.
SITTTING ROOM:
The door to the sitting room is locked. Players can gain access via a number of ways:
- Kicking down the door. The noise will draw the attention of Ormond & Rosetti if they’re around.
- Picking the lock. Feel free to use any items the players can find to justify picking the lock. Make it a fairly easy pull for the Thief.
- Finding the key. All staff and guard characters in this area should have one on or near their person.
DESCRIPTION:
The sitting room is comprised of comfortable reading chairs a round table piled high with books. The room is given an eerie quality by the four ancient statues placed in the corners of the room. The statues are wearing minimal clothing, so as to show off the tattoos painted on their bodies, but the paint is cracked and has largely flaked away due to time…and fire. Scorch marks have blackened large chunks of the dark stone in wild and uneven streaks. It’s hard to tell just how old these figures are.
TIMELINE:
- This room is static, unless player actions change this. It functions largely as a sound buffer between areas.
THINGS TO FIND:
- The four statues have plaques at their base describing these statues as relics from the Ptometan Empire. Feel free to make up your own stories to go with the plaques. Are these the figure representing gods? Were they powerful leaders? Or were they memorialised for other reasons?
GM Note: The statues are from the Ptometan Empire, a society of powerful magic users who fell centuries ago due to an unknown calamity. They are largely a mystery, so feel free to add extra tantalising details as you see fit.
FOYER:
DESCRIPTION:
The entrance foyer to the East Wing is decorated with a line of busts, tracing the lineage of Queens. Each bust has been painted to replicate the facial tattoos each queen wore. The bust at the end, Queen Isabella, is pale and lacking any tattoos.
There’s a set of large double doors that leads to the grounds outside. Each door has high round window inset, allowing you to see the clock tower.
When players enter this room during their first play through, it will be at a time when Nikolai has been attacked and bleeding out. This is the key scene that launches the game proper.
TIMELINE:
- When players get near to the foyer, Nikolai calls for help in a weak voice. Hopefully they will come and investigate.
- If players don’t come to the Foyer, Nikolai will stagger to their feet in search of help and encounter the players that way. If players didn’t even leave the prison, have them come to them and fall onto the prison grate.
- One way or another, players will encounter Nikolai and the following scene plays out:
KEY SCENE: Death of Nikolai
When players encounter Nikolai in person, they are badly wounded and bleeding out. You’ll recognise them as the heavily tattooed guard from before, with spiderweb-like markings covering all the skin you can see.
Nikolai is delirious from blood loss. They talk of seas and storms and sailors, as though they think they’re on a ship. They call one of the players “captain.” Then in a moment of lucidity they’ll cast their last spell. Their tattoos appear to melt away from their body and pool across the floor. This ethereal liquid will quickly slither along the ground and ooze up the bodies of the three prisoners. Even if players try to run, the ink will catch up to them. The ink finally seeps into each of the three players characters, leaving behind a complicated pattern as dense and delicate as a spiders’ web.
There’s a moment of silence as you contemplate what just happened. Some dark magic has occurred, but you don’t yet understand what it was. Each player is now marked with a part of the tattoo that once adorned Nikolai. (It’s up to the players if they’d like to decide where it is and what it looks like; it serves the same purpose.)
Give players a couple minutes to react to their situation or continue to explore the area. They won’t get far though, as soon as enough time has passed or they go to check out another room, there’s the sound of a gong and bells ringing out around the grounds.
[Play SFX4: Queen’s Bell]
A moment later, there’s a explosive sound from the grounds. Through the windows in the door you see the clock tower ripping apart. A red wave of energy bubbles out from the peak of the tower.
[Play SFX5: Red Wave Explodes]
It quickly expands outwards, passing right through the stone walls and into and through the room. The air quivers with heat distortion and the red wave passes through your bodies. You feel your blood boil and flesh drip away from your bones.
Then all is in darkness. For a moment, you feel nothing.
At this point the GM should knock over the tower and then rebuild the tower in full. Players won’t know it yet, but this tower will now represent the stability of the time loop – and it has its own unique set of rules.
- You do not explain these rules to the players. They will discover them by experimenting and by talking to Nikolai in future loops.
- As stated above, rebuild the tower in full. We want to give the players as much chance to succeed as possible.
- What just killed the players was a powerful wave of magical energy. The explosion came from within the Clock Tower. This will always kill the players and reset their loop, unless they can find a way to stop the explosion from happening.
- Player characters will remember everything from previous loops. But no one else will – not even Nikolai.
- Whenever any one of the three players dies, whether it’s the energy wave, being skewered by a guards’ sword or any other means of death, then players will loop back to the start of Act 2 where they arrive on at the manor by wagon. Do not knock over the tower when this happens.
- When the tower does finally collapse on its own, this represents the time loop having collapsed. Players will no longer loop to the start again and time will proceed from that point on as normal. Refer to the post-loop rules in Act 3 when this occurs.
What are the players trying to do in Act 2?
- Players will experiment and figure out the parameters of the time loop magic. Feel free to straight up kill a player (without making them pull a block) if they do something mortal like decide to take on an armed guard without having a weapon themselves. This will let them see that they can die and reset the loop without having to pull a block. It will also let them see that the tower retains it state each time the loop resets.
- Players will get good at certain things. They will learn the locations of certain objects, figure out routines and gain experience doing the same actions over and over. For some actions, players may only need to make pulls the first time they attempt it. If they’re sweet talking a guard in much the same way or picking a lock they’ve unlocked before, it’s essentially a risk free action. However if they’re trying a brand new approach to a situation, or fighting a particularly strong opponent, feel free to make players make pulls for these actions
- Players will try to befriend non-player characters. Since the players’ are criminals, they’ll find everyone in the manor is anatogonistic towards them. Players can use personal information or evidence they’ve acquired in past loops to gain the trust of characters. Or they might try disguising themselves to get by. Some characters will require both strong evidence and block pulls to sway their mind. (For example, if players’ want to convince Duke Verona that an assasination plot is afoot.)
- Players will inevitably re-encounter Nikolai when they go through the Foyer again. Nikolai will explain how their time loop magic works. Also if players’ find and show Nikolai the source of the red wave (in the clock tower) Nikolai will tell players’ the 4 items they need to undo the deadly ritual.
- Everything resets to its starting position at the beginning of a loop. Non-player characters won’t remember past conversations and items won’t stay in players’ pockets. If they need an item, they’ll need to re-acquire it each time.
- If players want, feel free to make your descriptions of events more succinct while keeping the events the same. This will allow players to quickly get through the loop without things getting too repetitive. If players are trying the exact same approach and no block pulls are required, you can ask players if they’d like to jump ahead past the scene, or just summarise it.
- It’s the role of the GM to keep things consistent and keep track of how players actions will change the current loop. Remember that player actions only exist for the duration of the current loop. Use the map to help both yourself and players keep track of things.
Um so what if a player dies before any of this happens?
There arent too many challenges in Act 1 so this is unlikely, but if they do have them just be slowly bleeding out, but barely alive. Rebuild the tower as normal and continue the story. Have them still get caught up in Nikolai’s ink and in the time loop shennanigans later on.
In which players are now trapped in the time loop. They must use this to their advantage to survive and escape their fate.
GM Note: There’s a lot of information here, but the GM should be especially familiar with the following key locations:
- Foyer (East Wing) Where Nikolai explains how the time loop works.
- Clock Tower (The Grounds) For information on how the red wave can be stopped and the 4 ritual items Nikolai will send the players to collect.
- Captain’s Office (West Wing) To understand why Captain Brunetti is motivated to assassinate the Queen and the Duke.
- The Duke’s Private Quarters (West Wing) For the confrontation scene where Captain Brunetti tells the Duke of his plot before triggering the red wave upon hearing the bells signalling Queen Isabella’s arrival.
[Play SFX1: Cart Arrives]
You see nothing but darkness, but you slowly become aware of a chafing sensation around your wrists and ankles. You feel a swaying beneath you and the sound of horses hooves.
The cart stops and the burlap sacks are pulled from your heads. You can see Duke Verona holding court.
“Eden Taylor. You have been found guilty of the crime of blood magic. In the name of Queen Isabella – long may she reign – you are hereby sentenced to death. Captain Brunetti: carry out sentencing if you please.”
Eden is beheaded by Captain Brunetti. Chef Galo steps forward and starts to present Lucas, when the clock tower chimes three times.
[Play SFX2: Clock Tower ]
Duke Verona quickly wraps up her court.
“This brings today’s hearings to a close. All unheard cases will receive justice on the morrow. This evening we have the honour of hosting the official Queen’s Day celebration, so look lively everyone. We haven’t much time before Queen Isabella and her entourage will arrive.”
The Duke orders for a guard to stash Eden in a coffin in the stables, Chef Galo to the kitchen and for the guards to send all prisoners – both Lucas and the three new arrivals – to the prison pits.
TO THE CELLS
You’re escorted across the grounds and into the East Wing Foyer. Nikolai is there, but their skin is devoid of any tattoos. The guards either don’t recognise them or they don’t notice, because no one says anything.
Guards continue to escort the players through the Sitting Room, through the hallway and into the Prison Pits.
GM Note: Of course, players’ are welcome to interrupt to the flow of the opening sequence. Players can now also explore the whole manor. The map is divided between the East Wing, the West Wing and the Grounds. There are links at the bottom of each room description to allow you to quickly jump to any of those areas. There’s also a link to act 3, which is triggered by the Jenga tower collapsing, signifying the collapse of the time loop. Lastly there’s a link to the Queen’s bell and clock tower explosion sound effects.
JUMP TO: East Wing | West Wing | The Grounds // Restart loop | Act 3 // Sounds
Prison Pit
PRISON PITS
DESCRIPTION :
A pair of deep pits form the prison cells. A single guard is on duty.
TIMELINE:
- The guards escort the prisoners to the prison pits and lock them up. [Play SFX3: Prison Grate]
- Some time passes. This is the time in which characters are getting in place and the rebel guards begin to kill off any loyalist guards.
- The Prison Guard recognises the voice of the player character accused of murder.
- Ormond and Rossetti enter. Using a bowl of flour as a distraction, they manage to surprise and kill the Prison Guard. They take their sword with them.
- The Prison Guard collapses atop the grate with their keys within reach.
- Eventually, the signal sounds to announce the arrival of Queen Isabella. The red wave of magical energy washes across the entire manor, killing everyone.
CHARACTERS:
Prison Guard
- The prison guard is actually an old friend of the player character accused of murder. Draw from their character sheet to generate their name.
- The prison guard has since found good prospects working for Duke Verona. They aren’t going to betray the Duke and release the prisoners – at least not unless the players manage to convince them somehow with knowledge gained in subsequent playthroughs.
- If the players don’t engage with the prison guard, have them overhear their old friend talking and chime in saying they recognise the voice of the murderer character.
- The prison guard is a good source of info on what will be the sentences for each crime. Witches are beheaded, murderers are sent as live bait on leviathan hunting ships and thieves lose a hand.
- They are currently reading a raunchy book while on guard duty: Waves Of Passion. It’s a homoerotic tale of love between two sailors on the high seas. It makes leviathan hunting seem much nicer than they actually are. In truth they’re extremely dangerous, but the meat and blood from these monster sized fishes make it worth the risk.
Lucas:
- Lucas is a kitchen assistant who works under chef Galo
- If asked about being accused of stealing silverware, he will deny the accusation fervently.
- Players can search his bed in the servants quarters and find a stash of the items that he has been stealing – but not the silverware. Players must find the silverware by following the clue stashed under his bed leading to a book in the library.
JUMP TO: East Wing | West Wing | The Grounds // Restart loop | Act 3 // Sounds
East Hall
EAST HALL
The hall is empty – except when Ormond and Rosetti pass through. (See timeline.) There are several doors here:
- The door to the Guard House is unlocked.
- The door to the Servants’ House is barred, but only from the outside with a broom.
- The Sitting Room door is locked.
TIMELINE:
- Ormond and Rosetti make several trips through the hall
- First they visit the Servants’ Quarters’ and bar the door
- Second they kill two guards in the Guard House in their sleep
- Third they visit the Prison Pits and kill the Prison Guard
- Finally they return to the Guard House to sit and play cards
- Eventually, the signal sounds to announce the arrival of Queen Isabella. The red wave of magical energy washes across the entire manor, killing everyone.
THINGS TO FIND:
- There’s nothing of interest in the hallway.
JUMP TO: East Wing | West Wing | The Grounds // Restart loop | Act 3 // Sounds
Guard House
GUARD HOUSE
DESCRIPTION:
The room is lined with rows of bunk beds, all with name plates saying the name of the guard who calls that bed home. Most bunk beds have small chests underneath them, containing the guards’ personal possessions.
TIMELINE:
- Ormond and Rosetti enter and slit the throats of a couple guards as they sleep. From here Ormond and Rosetti head to the Prison Pits to deal with the Prison Guard.
- After visiting the Prison Pits and the Servants’ Quarters, Ormond and Rosetti return to the Guard House to sit down and play cards. They remain here waiting out the arrival of Queen Isabella. If they notice the players, they won’t be happy to see them.
- As players pass by, have them overhear Ormond and Rosetti talking about the Duke’s ornamental sword. “…it was a gift from some noble or other. The sword is silver, so it’s not much use for fighting and it looks pretty ugly. So the Duke just keeps it hidden under her couch!”
- Eventually, the signal sounds to announce the arrival of Queen Isabella. The red wave of magical energy washes across the entire manor, killing everyone.
THINGS TO FIND:
- There are two dead guards in here, obviously killed in their sleep. Their uniforms are no good for disguises since they have blood all down their chests. The names of the dead guards are Frances and Lugo.
- There are no spare clean uniforms in this room – or spare weapons lying around. That would be too easy.
- Ormond and Rosetti both carry a key to the sitting room.
- The personal chest of the Prison Guard contains love letters between them and their partner Elliot, who is a fellow guard stationed at the royal palace. Searching the bed will reveal a vial of Elliot’s blood that dangles from a handsome chain necklace. Searching further players can also find a box containing the blood vials of past lovers.
- The personal chest of one of the dead guards contains a diary. The diary starts when they got their first paycheck from working here. He writes of his early excitement of working here and how he is sending money to his family back home so that they will live a better life.
- Players may want to search the bunks for other items or search the bunks of other characters they meet. Feel free to make up contents as needed. Bonus points for items that shed some light on the personality of a character as well as being a useful item to a player.
CHARACTERS:
- Ormond and Rosetti are rebel guards who are part of a plot to assasinate Queen Isabella. But players’ will learn about that plot once they get to the West Wing.
JUMP TO: East Wing | West Wing | The Grounds // Restart loop | Act 3 // Sounds
Servants Quarters
SERVANTS QUARTERS
The door to the servants quarters has a broom through the handle as a makeshift bar to lock the door. Players can easily remove the broom to enter.
DESCRIPTION:
The servants quarters is filled with bunk beds. Each bed has a name plate describing who sleeps here and underneath bed are chests containing people’s personal goods. One person is asleep here – a house staff member named Riley. There’s a large key sitting in plain sight atop the chest next to them.
TIMELINE:
- There is a servant, Riley, asleep here. They will stay asleep throughout unless player actions change this.
- Before Ormond and Rosetti go to the prison cells, they visit the servants quarters. Seeing Riley asleep, they bar the door with a nearby broom. This is to stop Riley from interfering with if they wake up. They don’t want to kill a non-guard if they don’t have to. (Ormond and Rosetti probably aren’t aware of the red wave.)
- Eventually, the signal sounds to announce the arrival of Queen Isabella. The red wave of magical energy washes across the entire manor, killing everyone.
THINGS TO FIND:
- iley the house servant is asleep here. Players will need to make stealth pulls if they don’t want to wake them up.
- There is a key to the sitting room in plain sight. Players can try to creep stealthily and steal it. (1 or 2 block pulls.) Or they can just rush in and take it for free, but doing so will wake Riley.
- Lucas has a bed here. Players can search the bed for stolen goods. A thorough will reveal a loose floorboard under the bed where he keep his stolen good. They’re many fine things in there, but strangely, not silverware. There is however the contents page torn out from a book called The First Blood Witches.
- Feel free to have one or two clean servants uniforms lying around.
- Players may want to search the bunks for other items or search the bunks of other characters they meet. Feel free to make up contents as needed. Bonus points for items that shed some light on the personality of a character as well as being a useful item to a player.
CHARACTERS:
- Riley will call for the guards if awoken. They of someone who believes that working for Duke Verona is an honour. They can barely remember the days when they used to hunt deer with their mother.
JUMP TO: East Wing | West Wing | The Grounds // Restart loop | Act 3 // Sounds
Sitting Room
SITTING ROOM
The door to the sitting room is locked. Players can gain access via a number of ways:
- Kicking down the door. The noise will draw the attention of Ormond & Rosetti if they’re around.
- Picking the lock. Feel free to use any items the players can find to justify picking the lock. Make it a fairly easy pull for the Thief.
- Finding the key. All staff and guard characters in this area should have one on or near their person.
DESCRIPTION: The sitting room is comprised of comfortable reading chairs around a table piled high with books. The room is given an eerie quality by the four ancient statues placed in the corners of the room. The statues are wearing minimal clothing, so as to show off the tattoos painted on their bodies, but the paint is cracked and has largely flaked away due to time…and fire. Scorch marks have blackened large chunks of the dark stone in wild and uneven streaks. It’s hard to tell just how old these figures are.
TIMELINE:
- This room is static, unless player actions change this. It functions largely as a sound buffer because areas as well as setting up some story elements.
- Eventually, the signal sounds to announce the arrival of Queen Isabella. The red wave of magical energy washes across the entire manor, killing everyone.
THINGS TO FIND:
- The four statues have plaques at their base describing these statues as relics from the Ptometan Empire. Feel free to make up your own stories to go with the plaques. Are these the figure representing gods? Were they powerful leaders? Or were they memorialised for other reasons?
GM Note: The statues from the Ptometan Empire, a society of powerful magic users who fell centuries ago due to an unknown calamity. They are largely a mystery, so feel free to add extra tantalising details as you see fit.
JUMP TO: East Wing | West Wing | The Grounds // Restart loop | Act 3 // Sounds
DESCRIPTION:
FOYER
DESCRIPTION:
The entrance foyer to the East Wing is decorated with a line of busts, tracing the lineage of Queens. Each bust has been painted to replicate the facial tattoos each queen wore. The bust at the end, Queen Isabella, is pale and lacking any tattoos.
There’s a set of large double doors that leads to the grounds outside. Each door has high round window inset, allowing you to see the clock tower. If players’ enter early enough they may be in time to try to stop Nikolai from getting mortally wounded.
TIMELINE:
- Nikolai is on guard duty in the foyer.
- The rebel guard Kepler enters through the front Foyer door. They attack and mortally wound Nikolai.
- Kepler then proceeds to use a padlock and a chain (wrapped in cloth to muffle the noise) to lock the doors to the Grand Hall. They then exit and probably go on guard duty in one of the towers. (They’re the one who rings the bell announcing the arrival of Queen Isabella.)
- After the attack, Nikolai is almost dead, slowly bleeding out.
- When players get near to the foyer, Nikolai calls for help in a weak voice. Hopefully they will come and investigate.
- If players don’t come to the Foyer, Nikolai will stagger to their feet in search of help and encounter the players that way.
- However this time the magic spell won’t happen. Nikolai will realise through the blood loss that they don’t have any tattoos left to cast the enchantment. They will realise they are already in the middle of a time loop.
- Eventually, the signal sounds to announce the arrival of Queen Isabella. The red wave of magical energy washes across the entire manor, killing everyone.
Talking to Nikolai:
Players will inevitably run into Nikolai again and when they do, they will hopefully ask Nikolai about their tattoos. If they don’t, feel free to have Nikolai recognise the players’ tattoos if they are visible. If Nikolai is injured and dying, have them ask the players’ to save him next time so he can tell them everything.
Once players’ find a way to keep Nikolai alive, he can explain the following:
- Their time magic was designed for use on ships. They used to be employed by a leviathan hunting ship. When they sailed into a storm or a leviathan punctured the ships’ hull, they would enchant the ships’ captain, navigator and first mate, allowing them to make better choices and ultimately survive. They retired to become a guard here because they thought a posting at a Duke’s manor would be safer.
- The time loop doesn’t last forever. You will retain memories of every loop, but the eventually the magic will degrade and the loop will be broken. This will happen naturally; you cannot break the loop willingly. (i.e. You can’t knock over the tower to break the loop.) When the tower falls then time will continue in normal linear fashion from that point on and there will be no more resets.
- The magic has limits. It takes weeks to set up the ritual, including doing a fresh set of tattoos. Nikolai can’t create a second time loop for the players. This is their only chance.
Players will hopefully mention the red wave and the clock tower exploding and killing everyone. Nikolai will recognise this as magical and ask to be taken to the clock tower, located in The Grounds where they will be able to identify the problem and propose a solution.
THINGS TO FIND:
- The busts of all the previous Queen’s
- The dining hall may be locked with cloth-wrapped chain, depending if Kepler has already killed Nikolai.
JUMP TO: East Wing | West Wing | The Grounds // Restart loop | Act 3 // Sounds
Dining Hall
DINING HALL
IF LOCKED:
If Kepler has already killed Nikolai, they will find the dining hall doors locked with cloth-wrapped chains.
- Players can come here before the hall gets locked by Kepler (which is after he murders Nikolai)
- Kepler probably has a key on his body
- Or players can use a suitable tool to break the chain or the lock.
- Or the thief can pick the lock if they have a suitable tool.
- As GM feel free to spawn suitable tools for the above tasks where you see fit, or have players make pulls to find the tools in areas that make sense.
DESCRIPTION:
A large polished dining table runs the length of the hall. Three house staff are busy setting the table with cutlery. (Due to the theft of the silverware, the Queen must dine using humble metal cuterly.) Suspended above the dining table is a flower arrangement hanging from the chandeliers. It spells out “Queen’s Day” in a dazzling array of colours. At one end of the hall is a full length portrait of Queen Isabella herself, her tattoo-less face looking regal beneath a jade crown. At the other end of the hall is a swinging door that leads to the kitchens.
When players enter the staff are gossiping about the Prison Guard and how they have a blood vial necklace from their lover. Some see it as sweet and old fashioned – something sweet that their grandparents would have done – while others’ are disgusted and find it taboo.
The staff will likely notice the players unless they have made efforts to disguise themselves. If alarmed, Chef Galo will come to the aid of her staff wielding a kitchen knife.
TIMELINE:
- The staff are busy setting the table from the beginning.
- Chef Galo will pass through here on her way to the kitchen after attempting to present Lucas for justice.
- Kepler will quietly lock the outside doors after killing Nikolai. With all the clatter and commotion of setup no one notices they are locked in.
- Eventually, the signal sounds to announce the arrival of Queen Isabella. The red wave of magical energy washes across the entire manor, killing everyone,
THINGS TO FIND:
- Plates, glasses, cutlery, candlesticks, teapots – anything that might be on a normal table setting is probably here.
- Sadly there is no silverware here.
CHARACTERS:
- The house staff are Mabel, Janesh and Sirah. Feel free to give them personalities as needed.
JUMP TO: East Wing | West Wing | The Grounds // Restart loop | Act 3 // Sounds
Kitchen
KITCHEN
DESCRIPTION:
The kitchen is in full swing, with several large copper pots boiling away. The scent of garlic and several unfamiliar spices are strong in the air. There are four large ovens filled with roasting chunks of leviathan meat surrounded by vegetables. On the benches are oysters, shrimps and several fruit platters, but most of the fruits are foreign and unfamiliar. You recognise only apples. You can only imagine where the various colourful fruits have been imported from. These are literally the fruits of foreign conquered lands. The decadence is almost overwhelming.
TIMELINE:
- The kitchen is empty, with the occasional house staff member popping in for supplies.
- Galo returns from the grounds and resumes her work. She has to work twice as hard without Lucas. She will continue working until the arrival of the Queen.
- Eventually, the signal sounds to announce the arrival of Queen Isabella. The red wave of magical energy washes across the entire manor, killing everyone.
THINGS TO FIND:
- There isn’t any silverware here. If you ask Galo about it she will reiterate that she believes Lucas stole them and stashed them somewhere.
- There’s a cabinet full of local and foreign wines, as well as the thick syrupy liquor known as Leviathan’s Blood. (Made with real distilled leviathan blood!)
- There are various useful items that can be used as tools or weapons. Knives, pans, pots, flints, etc. This is a good time for players to cut their rope shackles if they haven’t already.
CHARACTERS:
- Chef Galo is a broad woman dressed in a white chef’ uniform. Her hands are marked with concentric circle tattoos and her long hair is bundled up and pinned atop her head. She is loyal, hard working and stubborn. She is willing to take up a knife and wield it as a weapon if provoked.
JUMP TO: East Wing | West Wing | The Grounds // Restart loop | Act 3 // Sounds
JUMP TO: East Wing | West Wing | The Grounds // Restart loop | Act 3 // Sounds
The Grounds
THE GROUNDS
DESCRIPTION:
The centerpiece of the grounds is the clock tower. There’s a small stage in front of the tower where Duke Verona holds court. After the players have been sent to prison, if the pass through here again they will have to contend with guards in the towers. If they’re spotted the guards will let fly with arrows and raise the alarm. Players can disguise themselves or sneak around behind the clock tower and move when no one is looking.
The grounds is also a good place to pull guards from. If players’ are having too easy a time, put a guard or two on patrol here that might investigate if players’ are too loud or suspicious – or if someone calls for help. Otherwise just have the guards on the tower and leave the grounds clear of guards.
TIMELINE:
- As described earlier, prisoners arrive, the Duke postpones court to prepare her manor or the Queen’s Day celebration.
- Eventually Queen Isabella enters through the main gate, accompanied by her entourage. The gong and bells ring out to signal her arrival.
- The regal scene is interrupted when the clock tower explodes with a wave of red magical energy. The royal party is thrown in disarray and quickly perish beneath the red wave. The wave continues outwards from the clock tower and kills everyone within the manor grounds.
JUMP TO: East Wing | West Wing | The Grounds // Restart loop | Act 3 // Sounds
Toilets
TOILETS
DESCRIPTION:
The toilets are purely functional. Nothing of particular interest happens here. However, it can be a useful room for players’ to store things or to change outfits. It can also be used as a toilet.
JUMP TO: East Wing | West Wing | The Grounds // Restart loop | Act 3 // Sounds
The Clock Tower
THE CLOCK TOWER
DESCRIPTION:
The clock tower is an elaborate feat of construction. It stands proudly over the entire manor grounds. The outside of the tower is elegant stonework. The inside is chaotic with clockwork turning and churning away. There are stairs inside the take players to very top floor that houses the interior of the clockface, the bells and – surprise – the still beating heart of a bloodwich on a pedestal. All around the pedestal are three rings of ancient script written in blood. This is the source of the magic that creates the deadly red wave.
Disarming the heart:
When players bring Nikolai to the clock tower they will explain that this is old magic written in a language that dates back to the days of the Ptometan Empire. The heart is storing tremendous dark energy. When it detonates that energy will pulse out all over the manor grounds with radiant heat. The ancient words are like instructions, telling the heart when it should trigger this effect. It triggers in one of three ways.
- Disturbance: Players cannot just pick up or smash the heart. If they do, it will automatically detonate, killing everyone across the manor.
- At will: The heart can be triggered at will by those linked to it. A simple thought can set it off – and it appears that the script it linked to at least two people.
- By blood: If either of those linked to the heart are cut and they bleed, this also set off the heart.
Nikolai explains that with the right tools, he could alter the script. They could change it to render all of the instructions meaningless and inert. For this ritual they require four items:
- A blade of silver
- Alcohol made of leviathan’s blood
- A book from the library on Ptometic script
- A fresh human body. Either alive or very recently deceased.
Luckily there are multiple ways for the players to obtain these items. Don’t tell players the following – they’ll have to explore and find solutions for themselves.
Blade of silver
- Lucas is accused of stealing the silverware. Searching under their bed reveals some of their stolen goods, as well a clue: a page from a book called The First Blood Witches. If players go to the library they’ll find the silverware hidden inside this hollowed out book. Of course, if players have enough information they might be able to coerce this information out of Lucas himself.
- Guards in the guards’ quarters talk about how the Duke has an ornamental silver sword under her couch in her Private Quarters. This sword is stolen by Patrice while the Duke is getting changed. Patrice hides it in the Coin Office. Players can either try to steal it first or find it in the Coin Office – if they know where to search.
Leviathan blood liquor
- There is some stored in the kitchen. Players must first break the locked chains barring access to the Dining Hall (or stop Kepler from putting them on) and then get past the house staff and then find a way to steal it without arousing Galo’s ire.
- The alcohol is an optional item. It helps Nikolai focus, but they can work without it. If pressed, they will be honest about this fact.
Fresh human body
- Any character that isn’t a player character or Nikolai can be used for the ritual. Of course this means having to kill or let another person be killed in the process of this ritual.
- For guilt free magic, players can also use the fresh corpse of Eden whose body is stashed in the Stables after being executed for being a blood witch.
Book on Ptometic Script
- The library has a copy. Players can either make some pulls to search the library manually. Or if they manage to save the librarian from being murdered, they can find the book for you.
- Captain Brunetti has a copy in his office. You can just take the copy off his desks, but you’ll probably want to
DISARMING THE RITUAL:
Once players have all three of these things together in a single time loop, they can take them and Nikolai to the clock tower to conduct the ritual.
- Nikolai asks the players to lay out the fresh human body you’ve brought. Players will have to hold this person down if they’re still alive. Nikolai will use the silver blade to slice open their gut and use their body like an inkwell. Having their energy sapped like this will this person, if they’re not already freshly deceased.
- If they have the leviathan blood liquor, Nikolai will have a good long drink to steady their nerves.
- Nikoali will ask someone to hold the book of Ptometic script open. Nikolai will use the silver blade and the blood to edit the text and change the meaning of the words into something harmless.
- Once it’s done make a big show of it. Flashing lighting, rumbling noises – anything to communicate that a powerful spell has been broken.
Note: This does not affect the time loop. That won’t break until the tower falls. Players might need to do the ritual multiple times, but feel free to speed through it on subsequent runs.
Alternative Plans:
Of course player don’t even have to break the spell and save the day. Other approaches are equally valid
-
- Run away: Of course players may choose to simply run away from the manor and get enough distance so as not to be affected by the red wave. That’s totally valid as well!
- Stop the magic from being triggered: Players may also wish to try to stop the heart from being triggered in the first place. Captain Brunetti is the main trigger, while Patrice is the second trigger. They can set off the explosion just by thinking about it, or the trigger will occur automatically if they bleed. This means players will need to be clever in how they approach taking these two out. They might have to fail a couple of times to arrive at a solution.
- Eden substitution: Since Eden is also a bloodwitch, he can also fulfill the same role as Nikolai. If they manage to stall his execution and enlist his help, Eden can also help explain how the heart works and perform the ritual to undo the magic.
JUMP TO: East Wing | West Wing | The Grounds // Restart loop | Act 3 // Sounds
JUMP TO: East Wing | West Wing | The Grounds // Restart loop | Act 3 // Sounds
West Hall
WEST HALL
DESCRIPTION:
The West Hall is long and links to all of the rooms in the West Wing. It is decorated by paintings, all painted by the Duke herself. Her favourite subjects seem to be scenes of ships sailing into dark waters and images of the great leviathans that live in the deep and are regularly hunted for their meat. There is one striking painting of a ship off the coast of some icy tundra. A giant beast is tearing the ship apart. The creature resembles a gigantic penguin, but shelled in hundreds of pangolin-like armoured plates.
TIMELINE:
- Duke Verona goes through here to her Private Quarters.
- Captain Brunetti goes through here to the Captain’s Office. They also pass through later on when collecting Patrice and Lennaro from the Stables. From there the three of them go into the Duke’s Private Quarters.
- Patrice and Lennaro move around a bit and often pass through here. Patrice travels to the Duke’s Private Quarters followed by the Coin Office. She will then move to the Stables until she is summoned by Brunetti to confront the Duke in their Private Quarters.
- Lennaro travels to the Library, the Stables and finally to the Duke’s Private Quarters.
- Eventually, the signal sounds to announce the arrival of Queen Isabella. Brunetti triggers the red wave of magical energy that washes across the entire manor, killing everyone.
JUMP TO: East Wing | West Wing | The Grounds // Restart loop | Act 3 // Sounds
Stables
STABLES
DESCRIPTION:
The stables are surprisingly ornate. The thick timber has had images carved into the wood – mostly horse related. There’s a number of horses here, the best of which have also been tattooed to bless them with speed or bravery.
TIMELINE:
- A guard drops off Eden’s body and is popped into a cheap coffin in a cart.
- After killing Salvio in the Library, Lenaro comes to the Stables. Feel free to have him talk to the horses to calm himself down – and drop useful story hints that the players can overhear.
- After stealing a silver sword from the Duke’s Private Quarters and hiding it in the Coin Office, Patrice comes to the Stables to hang out with Lennaro.
- Patrice and Lennaro are eventually summonded by Brunetti to confront the Duke in their Private Quarters.
- Eventually, the signal sounds to announce the arrival of Queen Isabella. The red wave of magical energy washes across the entire manor, killing everyone.
THINGS TO FIND:
- Eden’s body will be delivered here. Popped inside a cheap coffin on the back of a cart. Eden is fresh enough that their blood can be used in the ritual to break the magic that causes the red wave. This means the players don’t need to kill anyone. Of course, they still need to figure out how to carry a body in plain sight.
- The prison cart the players’ arrive in is also stashed here.
- There are a handful of horses. Useful for escaping, if players can find a way past the guards at the gate.
- And if the Queen’s party ever survives thanks to the players, their horses and carriages will also be stashed here.
CHARACTERS:
- Lennaro is a rebel guard who is close to Captain Brunetti. He believes in Brunetti’s cause and is willing to die for it.
- Patrice is also loyal to Brunetti. She is special because she was also granted the power to ignite the red wave explosion. She is Brunetti’s backup trigger and she can do this at will.
JUMP TO: East Wing | West Wing | The Grounds // Restart loop | Act 3 // Sounds
Captain's Office
CAPTAIN’S OFFICE
The Captain’s Office is a humble afair. There’s no fancy, carved furniture here. Just a simple wooden table covered in papers and set of shelves at the back.
TIMELINE:
- After the court ends and the prisoners have been delivered, Captain Brunetti comes here.
- Brunetti sits down to pen their manifesto. They plan to send it off via pigeon to the Royal Palace after reading it aloud to Duke Verona.
- Brunetti finishes writing. They exit to the West Hall where they collect Patrice and Lennaro and together they go to confront the Duke in her Private Quarters.
- Eventually, the signal sounds to announce the arrival of Queen Isabella. The red wave of magical energy washes across the entire manor, killing everyone.
THINGS TO FIND:
- A guard roster for today with notes about those who are loyal to Brunetti’s cause – and note about those who are too loyal to the Duke to be involved. They must be disposed of quietly in case they interfere. (This is why the rebel guards set about murdering the loyalist guards within the manor at the start of the game.) Brunetti had arranged the roster to put as many of his own guards as possible within the manor walls.
- There’s a bundle of letters Brunetti has kept. Letters informing him of the death of his parents, the death of siblings, the death of friends from his old village. All people he was taken away from when he was conscripted into the army. This bundle of letters fuels his plot for revenge – and change.
- Somewhere on the desk is book on Ptometic script. (Feel free to have it visible on the desk if players are peeking through the doorway while Brunetti is in there – or have it hidden underneath the above papers so players’ get to learn a little bit about their antagonist.)
- Feel free to generate other useful items that the players’ might want to find on the shelves. Otherwise it can just contain objects that remind Brunetti of home – their old village that they were taken from many years ago.
CHARACTERS:
- Captain Brunetti is a veteran soldier. He feels that his life was stripped away from him by being conscripted into service by the Queen. He believes his actions today in assinating the Duke and the Queen will bring about change and end conscription across the land. This is why he is willing to make sacrifices, because it will save hundreds or thousands of young lives in the future – if his plan succeeds.
JUMP TO: East Wing | West Wing | The Grounds // Restart loop | Act 3 // Sounds
Duke's Private Quarters
THE DUKE’S PRIVATE QUARTERS
DESCRIPTION:
This is where the Duke sleeps, works and relaxes. As such they have three key areas within this open plan room.
Their sleeping area has a giant four-poster bed, a large oak dresser and modesty curtain for getting changed behind.
Their work area has a large desk piled high with official looking documents and books.
Their relaxation area has a plush sofa in front of a silver hookah. The scent of strawberries hangs in the air.
TIMELINE:
- After ending court proceedings, Duke Verona goes to her room to change into her finery for the evening celebration.
- While she is getting changed behind the modesty curtain, a guard named Patrice sneaks in and steals the ornamental silver sword hiding under the couch. (Patrice then hides the sword in the Coin Office.)
- Duke Verona then relaxes and smokes the hookah while waiting for the Queen to arrive.
- Eventually Captain Brunetti barges in along with a couple of guards loyal to him: Patrice and Lennaro. All three have their swords drawn in an aggressive stance. Duke Verona reaches for the sword under the couch, but there’s nothing there. Patrice mocks her, knowing very well where the sword is hidden.
- Captain Brunetti reads out part of the manifesto he has written: “For years I have seen young, strong people who had their whole lives ahead of them conscripted to fight in countries they’ve never heard of and steal land for a Queen they’ve never met. This ends today. No longer will we live or die by the whims of a war mongering monarch. Today the long reign of Queen Isabella comes to end. Today we decide our own fate – how we will live and how we will die.” (Paraphrase this as you see fit, as long as the intention is the same.)
- Captain Brunetti declares he is sending a full copy of his manifesto to the Royal Palace so they all will know he has killed the Duke and her Queen – and why he did so. Doing this, he hopes to end conscription along with the reign of Queen Isabella. Patrice leaves to send the message via pigeon in the Coin Office. Brunetti continues to hold the Duke captive while waiting for the Queen.
- Eventually, the signal sounds to announce the arrival of Queen Isabella. Captain Brunetti triggers his magic and a red wave of magical energy washes across the entire manor, killing everyone.
THINGS TO FIND:
- The silver sword starts underneath the couch – until it is taken by Patrice.
- There’s also plenty of fancy loot here that players may want to take. Feel free to generate riches or useful tools here as needed. There’s probably also canvas and painting tools around.
CHARACTERS:
- Duke Adele Verona is many things. She is the trusted voice Queen Isabella in this region. She is responsible for collecting taxes, dispensing justice, sending out conscription drives and much more. She has come to know a life of comfort where she enjoys working at her own leisure when she feels like it. In her off time she enjoys reading and painting. She has a bit of a smoking problem.
JUMP TO: East Wing | West Wing | The Grounds // Restart loop | Act 3 // Sounds
Coin Office
COIN OFFICE
It’s here that the business of governing the region takes place. There are hundreds of leather bound tomes and piles of scrolls stacked neatly in giant shelves. On the far wall is a large cage full of messenger pigeons. One of the windows can be unbarred to send pigeons on their way. Next to that is the treasury safe. It has a large combination lock fashioned to resemble a ships wheel’ wrought in iron.
TIMELINE:
- The office is empty, aside from the several dozen birds kept here.
- Patrice enters with the silver sword stolen from the Duke’s Private Quarters. She hides the sword in here.
- Patrice is dispatched here to send a copy of Brunetti’s manifesto out to the royal palace. This is a good opportunity for the players’ to confront Patrice on her own. However, keep in mind that she, like Brunetti, can also trigger the heart in the tower to explode at will. Feel free to have her give out this information, or anything else the players’ need to know, before she triggers the explosion.
- Eventually, the signal sounds to announce the arrival of Queen Isabella. Captain Brunetti triggers his magic and a red wave of magical energy washes across the entire manor, killing everyone.
THINGS TO FIND:
- The silver sword can be found here after Patrice hides it. (Have it hidden such that players’ won’t accidentally find it. They should have some level of knowledge that the sword is somewhere here in order to find it.)
- There are a good many different types of records here. Guard rosters, import records, farming permits, criminal records, previous court proceedings etc.
- Players may also write and send messages via the pigeons. Each one is tagged with their homing destination, including many of the small local villages and the Queen’s own palace.
- The treasury safe is packed full of money. If players are interested they can open it in a variety of ways. Perhaps with brute force, perhaps with some magical assistance or perhaps a character might give up the combination. Wing this however you see fit.
JUMP TO: East Wing | West Wing | The Grounds // Restart loop | Act 3 // Sounds
Library
LIBRARY
DESCRIPTION:
The Duke’s private library is a vast collection on a myriad of topics: the histories of the ancient world, biographies of famous painters, swashbuckling romances, memoirs of Queen’s past and much, much more. The bookshelves are tall and plentiful. This chaos is managed by a single old librarian named Salvio.
TIMELINE:
- Salvio is finishing the binding on an ancient and rare book – an early history of the royal families. This is a gift for Queen Isabella on her Queen’s Day.
- Lennaro enters and Salvio tells him that they’ve just finished restoring the book. Salvio says he’ll be taking it to the Duke herself now. Lennaro, worried that Salvio might interfere, offers to take the book for the librarian.
- The dispute quickly escalates. Salvio is insistent on taking the book himself and goes to walk out. Lennaro skewers the old man and he dies clutching the ancient tome.
- Lennaro exits and heads to the Stables, leaving behind Salvio’s body.
- Eventually, the signal sounds to announce the arrival of Queen Isabella. Captain Brunetti triggers his magic and a red wave of magical energy washes across the entire manor, killing everyone.
THINGS TO FIND:
- The book on Ptometic script is in here. It can be found by making block pulls to search the vast collection – or for free with the help of the librarian Salvio.
- A rare book on the early history of the royal families has been prepared as a gift for Queen Isabella.
- Feel free to generate other interesting books or library appropriate items as needed.
CHARACTERS:
Salvio:
- Salvio is the old librarian and book master. His grey hair is shaved short and his eyes are wide behind thick glasses. His face has several tattoos meant to preserve his eyesight from deterioration.
- Players can search the library by themselves for book on Ptometic script. But it takes time – and block pulls. It’ll take a tiny bit less with Nikolai – but Salvio makes it super easy. He will help you find the book in thanks for saving him.
JUMP TO: East Wing | West Wing | The Grounds // Restart loop | Act 3 // Sounds
[Play SFX4: Queen’s Bell]
[Play SFX5: Red Wave Explodes]
JUMP TO: East Wing | West Wing | The Grounds // Restart loop | Act 3 // Sounds
In which the players are released from the time loop and their adventure reaches an end…one way or another.
When the tower collapses, make it a standout moment for the characters. The tattoos bleed and melt away from their skin. Nikolai would still be totally tattoo free. Add in flashing lights and strange sensations as desired. Their characters no longer have their safety net and the players must play with a new set of rules.
The collapse of the tower represents the collapse of the time loop. From this point on we play with dice. Push the fallen tower aside and put the dice on the table: 3 white dice and just 1 of the 2 red dice.
(Save revealing the second red die for explaining ‘playing the odds’ at the end of this rules section. Also feel free to substitute white and red dice for other colours.)
Explain the following rules to the players and provide them a printout of the post-loop rules for their reference.
Rolling for success:
Whenever the player wishes to attempt an action that has an element of risk (an action that would normally be resolved with a block pull) you now roll four dice: 3 of them are white and 1 of them is red. You need to roll successes in order to accomplish the task you’re rolling for.
A success is a 4, 5 or a 6. The GM will advise how many successes are needed prior to rolling.
- One success is for easy actions
- Two for moderate risk actions
- Three for difficult actions
- And a rare four would be a miracle
Health blocks:
Players should have three tower blocks placed upright in front of them. These three blocks represent their health. Three strikes and they’re out. They can now die in this phase. Health blocks get knocked down when players’ roll badly on ‘dangerous rolls.’
Dangerous rolls:
The red die represents the element of danger. When the GM declares a roll to be dangerous (an action where your character may come to serious harm) then if the red die (and only the red die) comes up with a 1, 2 or 3 then this is a strike against that character and they must knock over one of their health blocks. If all three health block are struck down in this way then the character is captured or killed. A bad roll may also incur physical injuries, depending on context and at the discretion of the GM.
It’s important to note not all rolls are dangerous – only ones declared dangerous by the GM.
Playing the odds:
At this point the GM should pull out a fifth die and place it on the table. It’s another red die.
Before you roll, you can choose to add a 5th red die to any roll. But this makes the roll count as dangerous and if any of the red dice comes up with a 1, 2 or 3 then you get a strike. It is possible to get two strikes in a single roll in this way.
Finishing the story:
How the story continues is up to the players. Given the new rules it’s possible that one or all of them may perish if they push themselves too far. They’ve escaped one fate, but they’re still ordinary villagers accused of serious crimes. Here’s a non-comprehensive list of things players may try in attempting to escape their fate:
- Using allies: Players might earn themselves favour with Queen Isabella, Duke Verona or any other useful character. Will it be enough? Keep in mind the accused blood witch may have a tougher time befriending the Duke or Queen.
- Lesser sentences: Perhaps players might be happy to accept lesser sentences. Hard labour instead of being human bait on a leviathan ship. Having a finger cut off instead of a whole hand.
- Disguises: If players play things right, they might be able to walk right out the front gate. Of course, they’ll need a reason to leave the manor on such an important day.
- Front gate: This is probably the toughest way out, since the guards will be astute about who enters and leaves.
- Walls: Escaping over the wall will require some tricky climbing or a rope, but it’s possible.
- Coffin: There’s room for one player to hide in the coffin of poor Eden Taylor.
- Magic: Most blood magic rituals take a long time to prepare, otherwise that’d be too easy. But if players come up with something clever that Nikolai could do that doesn’t also break the game, feel free to incorporate it. Eden or even Brunetti might be able to help, if they’re alive and cooperative.
- Diversion: The guards are on high alert, but you might be able to use that in your favour. Light a room on fire, like the library, and see what kind of commotion unravels.
- Helping others: Players will likely want to help save the lives of characters they’ve come to care for. Make them work for the best possible outcome. Can they save characters like the Prison Guard and Salvio as well as themselves?
- Helping themselves: Players may want to take some of the wealth back home. Or take some supplies if it looks like they’re going to be on the run and can’t go back home. There’s plenty of good loot all around the manor.
Below are the navigation links in case you need to reference the map some more. But for anything that exists beyond the timeline of the loop feel free to make it up wholesale based on the players’ actions in the new timeline.
JUMP TO: East Wing | West Wing | The Grounds // Act 3 // Sounds
Once the players’ have escaped, succeeded or otherwise brought their story to an end, I like to wrap the game up with an epilogue for each character as well as an epilogue for how things pan out for the country as a whole. Did the Duke and the Queen survive? What does the future hold for blood witches and has this changed how conscription is perceived? What happens to Nikolai now? I like to play Time In A Bottle by Jim Croyce as ‘ending credits’ music to close out the game.
However your players’ choose to end their adventure – I hope it’s been a wild ride for everyone.
Thanks for playing!
Story and sound design by Kyle Evans.
The Dread system was created by The Impossible Dream.
Art collages from sources by Nicolas Postiglioni, Krivec Ales and Felix Mittermeier.